Meta Description: Transform your outdoor space today with these 8 secret, frugal wallet-friendly budget DIY home upgrades for garden makeovers. You do not need to spend a fortune.
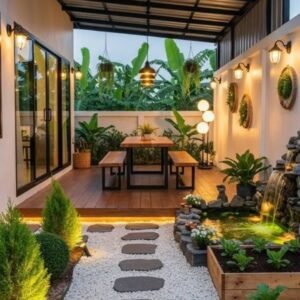
8 Secret Budget DIY Home Upgrades for Garden Makeovers
Is your garden looking a little sad and forgotten? Is the lawn full of bare patches, the beds empty? Does the whole space simply seem dull? The good news is that it doesn’t require thousands of dollars to fix it.
With the right budget DIY home upgrades for garden makeovers, you can turn the most boring backyard into a utopia. And best of all — most of these ideas cost very little money. Some cost almost nothing at all.
This guide covers 8 secret upgrades that most people forget about. These aren’t just the typical “buy a few flowers” suggestions that you see everywhere. These are clever, creative, and surprisingly effective ideas that can change entirely how your garden looks and feels.
So let’s get started.
Why Garden Makeovers Don’t Have to Be Expensive
A lot of people believe that garden upgrades mean hiring a landscaper and buying expensive materials. But that’s false. The best transformations in the garden come from sharp thinking, not big spending. By utilizing recycled materials, repurposing what you already own, and doing the work yourself you can save hundreds — sometimes thousands — of dollars.
A well-maintained outdoor space can boost your home’s value by up to 10%, according to a study by the National Association of Realtors. That’s an amazing return on investment for work that could cost as little as $50.
The secret is understanding which upgrades give you the most visual bang for your buck. That’s exactly what this list presents.
1. Make a Raised Garden Bed From Recycled Wood
Raised garden beds look sleek, professional, and expensive. They really are some of the cheapest upgrades that one could make, though.
What You Need
You can build a simple raised bed using:
- Discarded wooden pallets (generally free from hardware stores or warehouses)
- Reclaimed studs from old fences
- Untreated lumber from the discount bin
If you’re careful with your sourcing of material, a standard 4×8 foot raised bed unit can be constructed for less than $20.
How to Do It
Start by choosing a sunny spot in your garden. Lay your timber in a rectangle. Screw or nail corners together solidly. Just ordinary butt joints do fine — no need to get fancy.
Fill it with a mixture of topsoil, compost, and a pinch of garden mix too. This blend drains well and supports almost any plant.
Why This Works
Raised beds improve drainage, warm up quickly in the spring, and give your garden a structured, finished look. They make weeding so much easier too. You can grow vegetables, herbs, flowers — anything that takes your fancy.
Pro tip: Paint or stain the wood a bold color, making the beds a design feature rather than just functional.
2. Create a DIY Gravel Path
A winding pathway through a garden instantly makes it feel intentional and designed. It guides the eye and adds structure to what might otherwise look like a random collection of plants.
The Budget-Friendly Approach to Getting It Done
Pass up the costly paving stones! Instead use:
- Pea gravel (very cheap per bag)
- Crushed slate or bark chips
- Old bricks laid flat in a simple pattern
Depending on the material, a ten-foot path can run as modestly as $15–$30.
Build It in Steps
- Lay out your pathway making use of garden hose or string.
- Dig down about 5–8 cm deep.
- Lay a weed membrane to stop weed growth.
- Pour in the gravel or bark and rake it level.
That’s all — simple, effectual, and it looks great.
Extra Tip
Edge the path with flowers such as thyme, alyssum, or creeping phlox. These will spread out, cover the outline naturally, and when brushed give off a very light fragrance. It gives a feeling of luxury for virtually no cost.
3. Turn Old Containers Into Unique Plant Pots
One of the most overlooked budget DIY home improvement tricks when it comes to garden renovations is using everyday objects as flower containers. This costs almost nothing and is completely different for every garden.
What Can You Use?
Almost anything capable of holding soil will work:
| Container Idea | Where to Find It | Cost |
|---|---|---|
| Old colander | Kitchen drawer | Free |
| Wooden crate | Greengrocer | Free–$5 |
| Tin cans | Kitchen recycling | Free |
| Broken wheelbarrow | Toolshed | Free |
| Old boots or shoes | Wardrobe | Free |
| Ceramic mixing bowls | Secondhand shop | $1–$3 |
| Vintage suitcase | Garage sale | $5–$10 |
How to Make It Work
Drill a few holes in the bottom of each container for drainage. Fill with potting mix. Plant trailing flowers, succulents, or herbs depending on sunlight.
Group the containers in a pleasingly spread odd number grouping — three or five together. Mix the heights by putting some on upturned pots or wooden crates.
The Visual Effect
Eclectic container collections give any garden character and personality. They tell a story. They show creativity. And each visitor will question how you ever thought of all this.
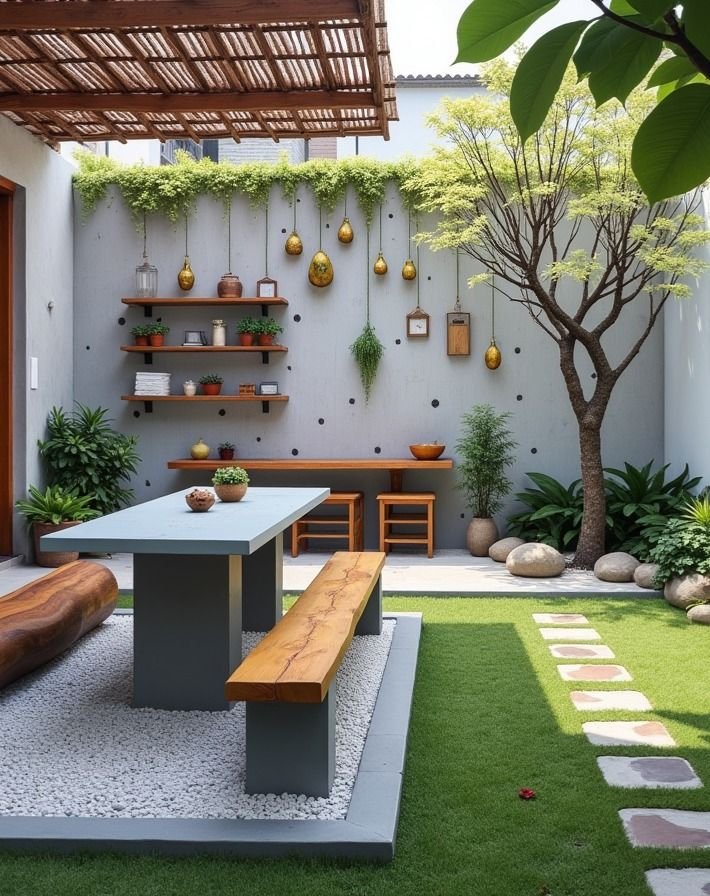
4. Go Green With a Cheap Vertical Garden on a Fence
Vertical gardens make an ordinary fence or stone wall into a striking living artwork. That is why it’s one of the most radical DIY garden upgrades you could try for practically no cost. If you enjoy experimenting with affordable outdoor ideas, Frugal Home Renovator is a great resource for more budget-friendly inspiration.
Budget Vertical Planting Alternatives
- Pallet planter: Staple landscaping fabric to the back of a pallet and fill compartments with soil for succulents or herbs.
- Gutters: Old plastic gutters are mounted lengthwise and filled with planting soil. They are ideal for shallow-rooted plants such as lettuce and strawberries.
- Hanging shoe organizers: These cloth pockets attach to any wall and can contain herbs or small flowers.
- Tin cans: Paint them a uniform color, drill some drainage holes, and attach them with screws to a piece of wood for a weathered effect.
What to Plant
Items you install and forget:
- Succulents (like Echeveria)
- Basil, parsley, chives — low-maintenance herbs
- Trailing flowers such as lobelia or bacopa
- Ferns and ivies which create a dense green field of foliage
Cost Breakdown
| Method | Estimated Cost |
|---|---|
| Pallet planter | $0–$10 |
| Gutter sections | $10–$25 |
| Shoe organizer | $5–$15 |
| Tin can display | $0–$5 |
Under $30 can be used to install an entire vertical garden feature and turn an otherwise unsightly fence into a stunning garden wall.
5. Make Use of Outdoor Paint to Transform Drab Surfaces
This is the quickest of all low-cost upgrades. A tin of outdoor paint can breathe new life into:
- Old concrete pathways
- Weathered wooden fences
- Weathered garden furnishings
- Terracotta containers
- Brick walls
The Effect of Color
Color is the single most powerful tool in garden design. A brightly painted fence becomes a feature wall. A crumbling shed becomes a focal point. Even painting terracotta pots in a coherent color scheme ties your whole garden together instantly.
What to Buy
- Masonry paint for walls and concrete (around $10–$15 per liter)
- Fence paint or wood stain for wooden structures
- Chalk paint for furniture — it sticks to almost any surface without priming
Tips for Best Results
Clean the surface well before painting. Remove any flaking paint with a wire brush. Apply two thin coats rather than one thick one.
For a really polished look, choose two or three colors that work together. For example: white fence, sage green shed, terracotta pots. Simple color coordination makes everything look planned and intentional.
6. Add Outdoor Lighting With Solar Stake Lights
Lighting changes everything. It extends the time you can use your garden. It makes the space feel magical after dark. And it highlights your hard work throughout the rest of the year.
Solar stake lights require no wiring, no electrician, and no continuing electricity cost. They charge during the day and automatically switch on at dusk.
Best Places to Put Them
- Along pathways to guide foot traffic
- Around the base of feature plants or trees
- Inside raised beds for a glowing effect at night
- Along fence lines to define the garden’s shape
- Inside containers or planters for a fairy-light effect
What to Look For When Buying
You don’t need to spend much here. A pack of 10 solar stake lights is usually between $15 and $25. Look for:
- Warm white light (looks more natural and welcoming)
- Stainless steel or weatherproof casing
- An automatic on/off sensor
Beyond Stake Lights
If you want to create a more dramatic effect, consider stringing solar-powered lights between fence posts or along your pergola. These impart the warmth of a festive atmosphere and take up only a tiny bit of money.
The result: A garden that looks sensational at night and transforms into a different place entirely once the sun sets.
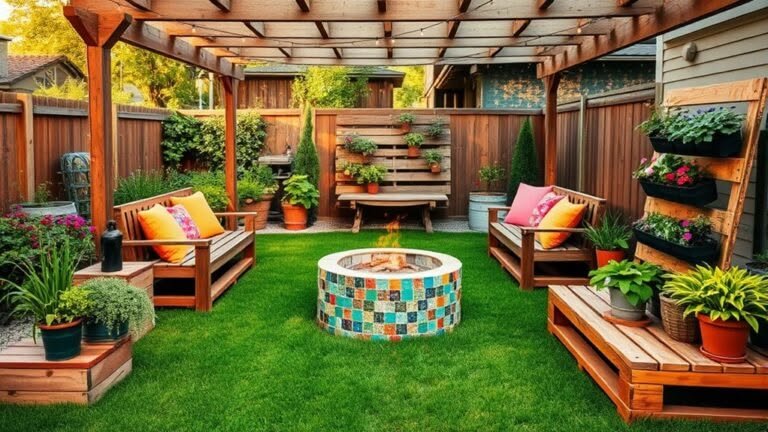
7. Build a Simple DIY Fire Pit or Seating Area
In an instant, a fire pit turns your garden into a social space. It changes the focal point from house to garden, introduces warmth on chilly evenings, and makes your garden feel like an outdoor living room.
The Budget Build
You don’t need a ready-made fire pit. Here’s how to make your own for almost nothing:
Option 1 — The Ring Build Gather large stones or buy a bag of retaining wall blocks for about $15–$20. Arrange them in a circle about three feet across on a piece of bare earth or gravel. Done.
Option 2 — The Brick Build Use old bricks laid in a circular pattern — no mortar needed for a simple decorative pit. Just stack two layers high.
Option 3 — The Metal Drum An old metal drum or barrel cut in half makes a very good fire pit. Sometimes these can be found free on local listing sites.
Put a Seating Area Around It
Round the fire pit, place:
- Tree stumps as rustic stools (free from tree surgeons or fallen trees)
- Cinder block seating with wooden plank tops ($20–$30 total)
- Old pallets stacked and cushioned with outdoor fabric
The Total Cost
A complete fire pit with seating can be made for $0–$40 depending on how resourceful you are with materials.
8. Create a Wildflower Patch for Color and Wildlife
This is the most straightforward upgrade on our list, and it is perhaps also the most beautiful. A wildflower patch requires very little effort and minimal expense. It gives a stunning burst of colour and can even attract butterflies and bees.
The Secret of Success With Wildflowers
Wildflowers are naturally occurring plants that require less input. They don’t need fertilizer. They don’t need watering once they are established. They self-seed and come back year after year with little or no effort on your part.
A small patch of mixed wildflowers can include poppies, cornflowers, ox-eye daisies, foxgloves, and chamomile — giving forth a wave-of-color effect reminiscent of an oil painting.
How to Plant One
- Get an area that’s sunny and has poor soil. (Poor soil actually encourages wildflowers, not rich. Rich soil means weeds.)
- Prepare the ground by removing all vegetation — grass and weeds.
- Lightly rake the soil to break up the surface.
- Scatter seeds by hand — don’t bother to be neat and tidy.
- Gently water, then wait.
Cost
One packet of mixed wildflower seeds costs between $3 and $8. That’s all. One packet can spread surprisingly far.
Extra Benefit
A wildflower patch draws in local pollinators. This can help increase yields in your main vegetable garden or fruit trees too. An inexpensive upgrade that gives back to the entire garden ecosystem.
Quick Comparison: All 8 Upgrades at a Glance
| Upgrade | Estimated Cost | Difficulty | Visual Impact |
|---|---|---|---|
| Raised garden bed | $0–$20 | Easy | High |
| Gravel pathway | $15–$30 | Easy | High |
| Repurposed containers | $0–$10 | Very Easy | Medium–High |
| Vertical garden | $0–$30 | Medium | Very High |
| Outdoor painting | $10–$25 | Easy | Very High |
| Solar lighting | $15–$25 | Very Easy | High |
| Fire pit + seating | $0–$40 | Medium | Very High |
| Wildflower patch | $3–$8 | Very Easy | High |
Garden Makeover on a Budget: Important Points to Consider
Carry out a bit of thinking before you lift a paintbrush or buy gravel. It saves time and money later on.
See what you already have. Stroll around your backyard and jot down every little thing that can be repurposed, painted, or repaired. Most people are surprised by how much they might already have.
Shift your focus. Rather than trying to improve everything at once, choose one feature to build around — a raised bed, a fire pit, a vertical wall. Everything else supports that central feature.
Get the materials for free first. Go on local Facebook groups, Freecycle, Craigslist, or Nextdoor before you buy. Pallets, old bricks, stones, and even plants are often given away.
Fix it up in stages. You do not need to get everything done at once. A garden makeover done in stages over the space of a few months is just as satisfying — and much kinder to your pocket.
FAQs About Budget DIY Garden Makeovers
Q: What is the cheapest way to transform a garden? The cheapest way is to start with what you already have. Repurposing containers, painting old furniture, and planting wildflower seeds are all extremely low-cost changes that make a big visual difference.
Q: How much does a DIY garden makeover typically cost? Doing a basic makeover using the ideas in this article will cost from $30 to $150 depending on how many improvements you make. Most individual projects are under $30.
Q: Do I need any special skills for these projects? No, every project in this guide is beginner friendly. If you know how to use a screwdriver and a brush, then you can do most of these projects without any prior experience at all.
Q: My yard is so tiny — can a garden makeover still be done? Sure, it’s not a problem at all. Usually, small gardens, balconies, and courtyards benefit more from these particular upgrades because the impact is concentrated in a smaller space.
Q: Will these changes add extra value to the sale price of my home? Certainly. Curb appeal and outdoor living spaces are two major factors in what home buyers look for. Even just some paths or a small fence can make a home more attractive to potential buyers and therefore seem more valuable.
Q: How long will these projects take me to finish? Most of these projects can be completed in a single weekend. It’s 5–12 weeks from sowing seed until the wildflower patch finally blooms, but the work itself isn’t more than an hour long.
Q: What types of plants work best for a low-maintenance garden makeover? Succulents are one good choice because they do not need much water or care besides being planted in well-drained soil. Wildflowers, ornamental grasses, and native shrubs are also excellent low-maintenance options that thrive with minimal attention once established.
Smoothing It All Together
You can make over your garden into a place of beauty without having to spend a lot of money. After a few weekends of inspiration and perspiration, just look at what these budget DIY home upgrades for garden makeovers can do.
Each of these upgrades provides sensational results for minimal cost. From raised beds made with reused wood to solar lights that let you enjoy your garden even after sundown.
The secret isn’t any one project per se. It’s the cumulative impact. When you layer together all those low-cost improvements — a painted fence, a gravel path, some container plants, or a wildflower patch — a total effect emerges which looks as if it must have cost much more money than was actually spent.
Begin small. Choose one task this weekend. Notice the difference. Then build on it.
Your dream garden is closer, and cheaper, than you thought.