Meta Description: Budget DIY home upgrades for small kitchen storage don’t have to cost a fortune. Discover 12 clever, affordable ideas to maximize every inch of your tiny kitchen.
Do-It-Yourself Budget Upgrades: 12 Small & Secret Storage Solutions for Kitchens
Is preparing a meal like playing Tetris in your kitchen? Pots clanging against pans, spices tumbling off counters and grocery bags shoved into haphazard corners — small kitchens can seem like an insurmountable task.
The good news is: you don’t need a whole renovation, or a large budget, to correct it.
With a few clever home-improvement tricks, some simple tools and materials you can buy for less than $20, you can totally change how your kitchen operates. They are practical, inexpensive and achievable by a novice on a weekend.
Let’s dive into 12 secret budget DIY home upgrades that will make your little kitchen feel like it’s twice the size.
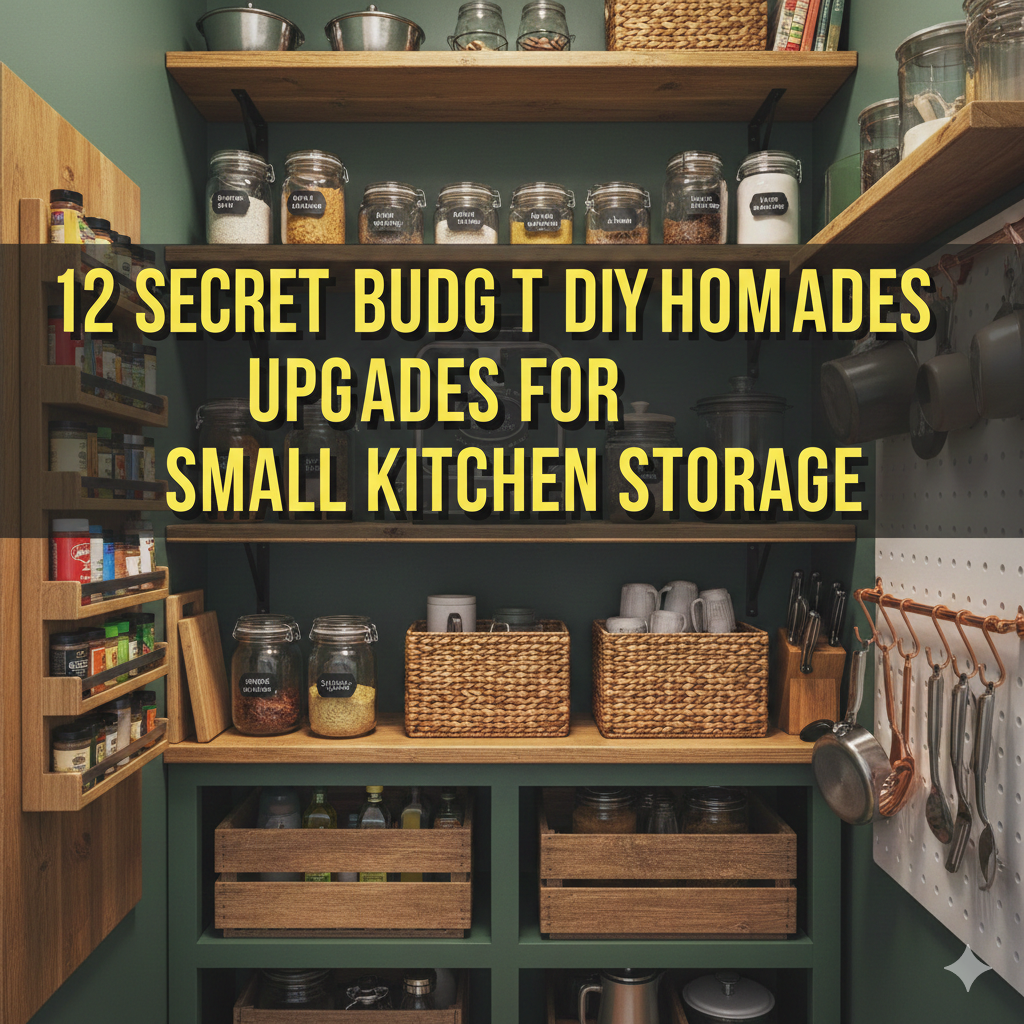
H2: Reclaim Counter Space by Mounting a Pegboard Wall
One of the best-kept secrets in small kitchen design is the unassuming pegboard.
A pegboard is a flat board covered with small holes. You mount it on your wall, and then you use hooks, baskets and pegs to organize just about everything — pots, pans, utensils, cutting boards and even small shelves.
Why it works: It transforms a section of dead wall space into an entire storage system.
What you need:
- A pegboard sheet (go to any hardware store for about $10–$20)
- Wall anchors and screws
- Pegboard hooks (about $5–$8 in packs)
How to do it: Trim the pegboard to fit your wall space. Space-mount it so there’s a small gap between the board and wall — this allows the hooks to slide in from behind. The only limit is what color you paint it to match your kitchen aesthetic.
Cost estimate: Under $30 total.
Just that one upgrade can clear your whole counter of clutter. Many home cooks say a pegboard changed their kitchen life completely.
Utilize the Interior of Cabinet Doors (This Is a Big One People Overlook)
Look in your kitchen cabinet right now. Take a peek at the inside of the door. What do you see? Probably… nothing.
That empty space is precious storage real estate.
Small racks, hooks or organizers can be attached to the inside of cabinet doors in roughly 15 minutes. Use it to store:
- Spice packets and small jars
- Measuring cups and spoons
- Lids for pots and pans
- Rolls of foil, plastic wrap and parchment paper
Great products for this: Over-the-door wire racks or adhesive hooks (both $5–$12).
If you use strong adhesive strips, no drilling is necessary. Just be sure that the cabinet door can close tightly after you put in the organizer.
Cost estimate: $5–$15 per cabinet door.
Make a Floating Shelf Above the Sink
The wall space above your kitchen sink is nearly always empty. But it’s actually an ideal place for a small floating shelf.
You can tuck dish soap, sponges, small plants or a few frequently-used spice jars in here.
DIY steps:
- Purchase a wooden board (a 1×6 or 1×8 board works well)
- Sand it down and either stain or paint it
- Attach L-brackets to the wall
- Place the board on top and screw it in
Total time: About 1 hour. Total cost: $10–$25 based on wood and bracket style.
Also, check for studs in the wall before drilling, or use adequate drywall anchors. A collapsing shelf is worse than no shelf.
Use a Tension Rod Under the Sink for Cleaning Supplies
Your kitchen sink cabinet is probably a disaster zone. Bottles tumble, bags stack up and you can’t locate what you need.
Here’s a $3 fix: a tension rod.
Hang spray bottles from a tension rod stretched across the inside of the cabinet. The bottles hang upside down by their triggers, which allows the entire floor of the cabinet to be used for something else.
What you need:
- One tension rod ($3–$6)
- That’s literally it.
You can also install a second rod on the other side and hang more things with small S-hooks. This little upgrade is one of the most satisfying quick wins in any kitchen.
Cost estimate: $3–$10.
Organize With a DIY Vertical Spice Rack
Spices are compact but they occupy staggering amounts of real estate. Most of us dump them into a drawer or cabinet shelf, where they become lost and forgotten.
A vertical spice rack fixes that whole problem.
Option 1 — Magnetic spice jars: Purchase small magnetic tins (around $10–$15 for a set). Fill them with your spices. Affix a magnetic strip to your wall or fridge side. Now your spices are on display, accessible and totally off the shelf.
Option 2 — DIY tiered shelf: Use scrap wood or foam board to create a tiered riser inside your cabinet. This allows you to see the jars in the back without having to dig through everything in front.
Option 3 — Wall-mounted test tube rack: They look cool and are around $12–$18. They’re great for spices you use often.
| Spice Storage Option | Cost | Difficulty | Space Saved |
|---|---|---|---|
| Magnetic wall tins | $10–$15 | Easy | High |
| DIY tiered riser | $0–$8 | Easy | Medium |
| Test tube rack | $12–$18 | Easy | High |
| Over-door rack | $8–$14 | Very Easy | Medium |
Hang a Wire Basket Rack From the Ceiling
This one seems like a reach, but it’s so much easier than you’d think — and it adds serious character to a small kitchen.
A ceiling-hung wire basket rack (also known as a pot rack) provides the perfect place to hang pots, pans and even fruit baskets from above. This frees up an entire cabinet and keeps your cookware within easy access.
DIY version:
- Get a basic wire grid panel (these are often sold as shelving panels, $10–$15)
- Drill ceiling hooks into the joists of your ceiling
- Hang the grid using S-hooks and short chains
- Add S-hooks below so you can suspend pots and pans
Safety tip: Drill only into ceiling joists, not merely drywall. First find them with a stud finder (or borrow one). Pots are heavy, and you don’t want the whole rack falling onto your head.
Cost estimate: $15–$35 for a DIY version.
Build a Rolling Cart From the Ground Up (or Repurpose One)
A rolling kitchen cart is a storage upgrade that also acts as extra counter space. The best part? You can find an inexpensive one, or repurpose an old piece of furniture.
Build it: Find a wooden crate or old nightstand. Attach locking caster wheels from a hardware store ($8–$12 for a set of four). Sand and paint it. Done. Now you have yourself a mobile kitchen island.
Upcycle it: Search Facebook Marketplace, thrift stores or garage sales for a vintage bar cart, nightstand or dresser. A coat of paint and some new wheels can transform a $10 thrift shop score into a kitchen storage hero.
Uses for your cart:
- Extra prep surface
- Store pots and pans below
- Keep appliances you use often
- Use hooks on the sides to hang towels or utensils
Cost estimate: $15–$40, depending on whether you build or upcycle.
For more smart and affordable home improvement ideas like these, check out Frugal Home Renovator — a great resource for budget-conscious DIYers looking to make the most of every room.
DIY Dividers for Vertical Storage in Deep Cabinets
Deep kitchen cabinets are an actual trap. Stuff gets pushed to the back and forgotten forever. Baking sheets, cutting boards and pan lids, in particular, like to tumble over and make a mess.
The fix? Vertical dividers.
Simple DIY method:
- Cut strips of thin plywood or foam board to the height of your cabinet interior
- Space them about 3–4 inches apart
- Secure with either wood glue or small L-brackets
Now you can stand baking sheets, cutting boards and flat pans upright like files in a filing cabinet. It keeps everything tidy and nothing falls over.
Simplest version: Metal bookends ($5–$8) or tension rods stood vertically inside the cabinet. No cutting needed.
Cost estimate: $5–$15.
Build a Magnetic Knife Strip Instead of Using a Knife Block
A knife block occupies prime real estate on a countertop. A magnetic knife strip performs the same function on your wall with zero counter real estate.
DIY option: Get a wooden board and attach robust neodymium magnets underneath (or get them embedded in a strip). Mount the whole thing to your wall.
Pre-made option: A basic magnetic knife strip costs $10–$20 and takes about 10 minutes to install.
Either way, this is one of the most straightforward budget DIY home upgrades for small kitchen storage — and it makes a big visual impact too. Knives displayed on a strip actually look really cool.
Bonus: A magnetic strip can also hold metal spice tins, scissors or small metal tools.
Cost estimate: $10–$25.
Give Old Jars and Cans a Second Life as Countertop Organizers
This upgrade costs nearly nothing and can look outstanding with a touch of creativity.
Save old glass jars (pasta sauce, pickle and mason jars) or large tin cans. Clean them out. Then use them to organize:
- Utensils (spatulas, wooden spoons, whisks)
- Note pads and pens for grocery lists
- Straws, toothpicks, rubber bands
- Dish brushes and sponges
Make them look great:
- Paint the cans with chalkboard paint so you can label them
- For a rustic look, wrap jars with twine or burlap
- Group 3–5 jars together on a small tray for a tidy, polished appearance
Cost estimate: $0–$10 (mostly free, if you repurpose what’s already on hand).
This is the kind of budget DIY home upgrade that feels even better knowing you made something out of nothing.
Install a Slim Pull-Out Storage Rack in Narrow Spaces
In almost every kitchen, there is a narrow gap somewhere — between the fridge and wall, between two cabinets, or next to the stove. That gap could be just 4–6 inches wide. But don’t write it off.
A slim pull-out rack fits snugly in those gaps and holds an impressive amount.
What to store on a slim pull-out rack:
- Canned goods
- Spice bottles
- Foil and wrap rolls
- Cooking oils and vinegars
DIY version: Build a simple frame from thin wood with small shelves and attach caster wheels to the bottom. Add a small handle to the front.
Buy version: Slim pull-out racks are available online for $20–$40 and typically don’t require any installation — you just slide them in.
| Gap Width | Storage Capacity | Best Use |
|---|---|---|
| 4 inches | Low | Spices, foil rolls |
| 5–6 inches | Medium | Canned goods, bottles |
| 7–8 inches | High | Full pantry-style rack |
| 9+ inches | Very High | Full pull-out cabinet |
Cost estimate: $0–$40 depending on DIY vs. purchase.
Make the Most of Corner Cabinets With a Lazy Susan or Homemade Turntable
Corner cabinets are awkward. Stuff gets pushed into the dark back corner and you forget it’s there for months. A lazy Susan (a rotating tray) makes this problem go away instantly.
DIY turntable: Get a cheap lazy Susan bearing at a hardware store ($5–$10). Attach it to a circular slab of plywood or a cutting board. Put it inside your corner cabinet. Just spin it to access whatever is stored on it.
Two-level version: Create two spinning trays and stack them using a short wooden dowel as a center post. Now you’ve doubled your usable corner cabinet space.
What to store on it:
- Canned goods
- Condiments and sauces
- Baking supplies
- Coffee pods, sugar and creamer
Cost estimate: $5–$20.
Quick Summary: All 12 Upgrades at a Glance
| # | Upgrade | Estimated Cost | Difficulty | Time to Complete |
|---|---|---|---|---|
| 1 | Pegboard wall | $20–$30 | Easy | 2–3 hours |
| 2 | Inside cabinet door organizer | $5–$15 | Very Easy | 15 min |
| 3 | Floating shelf above sink | $10–$25 | Easy | 1 hour |
| 4 | Tension rod under sink | $3–$10 | Very Easy | 5 min |
| 5 | Vertical spice rack | $10–$18 | Easy | 30 min |
| 6 | Ceiling wire basket rack | $15–$35 | Medium | 2–3 hours |
| 7 | Rolling cart (DIY or upcycle) | $15–$40 | Easy | 1–2 hours |
| 8 | Cabinet dividers | $5–$15 | Easy | 30–45 min |
| 9 | Magnetic knife strip | $10–$25 | Very Easy | 10 min |
| 10 | Jar/can countertop organizers | $0–$10 | Very Easy | 20 min |
| 11 | Slim pull-out rack | $0–$40 | Medium | 1–3 hours |
| 12 | Lazy Susan for corner cabinet | $5–$20 | Easy | 30 min |
Tips Before Getting Started on Your DIY Kitchen Project
Getting excited is great. But jumping into a project without doing some prep work can lead to wasted time and money. Keep these tips in mind before you get started.
Measure First, Buy Second
Always measure your space before purchasing anything. A shelf that is 2 inches too wide is worthless. Write your measurements down and save them on your phone when you go shopping.
Test Layout With Painter’s Tape
Use painter’s tape on the wall to mark where a shelf or pegboard will be before drilling any holes. Step back and look at it. Just be sure it feels right before you commit.
Start With the Easiest Wins
If you’re not so handy, tackle upgrades 2, 4, 9 and 10. They cost virtually nothing, take about 20 minutes each and require no drilling. Get some practice in before attempting the heavier lifting.
Buy Quality Anchors and Screws
The most important and least expensive element of any wall upgrade is the hardware that keeps everything up. Avoid cutting corners when it comes to screws and anchors. Spend an extra dollar or two for the right ones.
According to The Family Handyman, using the correct wall anchors for your wall type is one of the most common mistakes DIYers make — and one of the easiest to avoid.
FAQs: Budget DIY Kitchen Storage Upgrades
Q: What should I budget for a complete small kitchen storage overhaul? A: If you take the plunge on all 12 upgrades, you’re talking about spending around $100–$200 total — a fraction of what a single cabinet installation would run. Consider spreading the projects over several weekends to manage costs.
Q: Do I need power tools for these projects? A: Not for most of them. A simple drill will come in handy for mounting shelves and pegboards, but most of these upgrades rely on adhesive strips, tension rods or pre-made organizers. The rest needs only a $20 hand drill from a discount store.
Q: Will any of these upgrades work in a rental apartment? A: Many of them, yes. There are lots of options that don’t require any permanent changes, like adhesive hooks, tension rods, cabinet door organizers, lazy Susans, rolling carts and jar organizers. Just make sure to check with your landlord before you drill anything.
Q: What single upgrade makes the biggest difference? A: The pegboard wall delivers the most visible transformation. But if you want the most bang for five minutes of effort, it’s hard to beat the tension rod under the sink — it costs $3 and instantly transforms how that whole cabinet works.
Q: Can I combine and remix these ideas? A: Absolutely. These 12 budget DIY home upgrades for small kitchen storage are meant to work in unison. First stack a few of the quick wins, then progressively add the bigger projects.
Q: How can I make DIY kitchen storage look stylish, not messy? A: Use a cohesive color scheme. Use matching containers where possible. Keep labels clean and readable. Group similar items together. Even the most basic storage shines when it is uniform and organized.
Conclusion: Small Kitchen, Big Potential
A tiny kitchen need not feel cramped and chaotic.
With these 12 budget DIY home upgrades for small kitchen storage, you can have a kitchen that really works for you — one that is organized, functional and even fun to cook in.
The best part? You don’t have to spend big bucks. You don’t have to pay anybody. And you don’t have to be a DIY pro.
Pick one project this weekend. Choose the one that can fix your greatest pain point right now. And once you notice the difference, you won’t be able to stop.
A well-organized kitchen transforms your feelings about cooking. It cuts down on time, lessens stress and makes your entire home seem more put together.
So get your measuring tape out, choose your first upgrade and get to work. Your kitchen — and your sanity — will be grateful.